You’ve got a PNG file on your computer, but you need JPG. Or maybe you’re working with WebP, TIFF, or PDF files. Converting images to JPG format is one of the most common digital tasks—but there’s more to it than just clicking “convert.”
The wrong approach can destroy image quality, balloon file sizes, or create compatibility nightmares. This guide walks you through exactly how to convert any image to JPG, why you might need to, and the critical decisions that separate crisp, professional results from pixelated messes.
What Is JPG Format and Why Convert?
Before diving into the how, let’s talk about the why. JPG (sometimes written as JPEG) isn’t just another image format—it’s engineered for a specific purpose, which is why it’s been the internet standard for decades.
Understanding JPG (JPEG) Compression
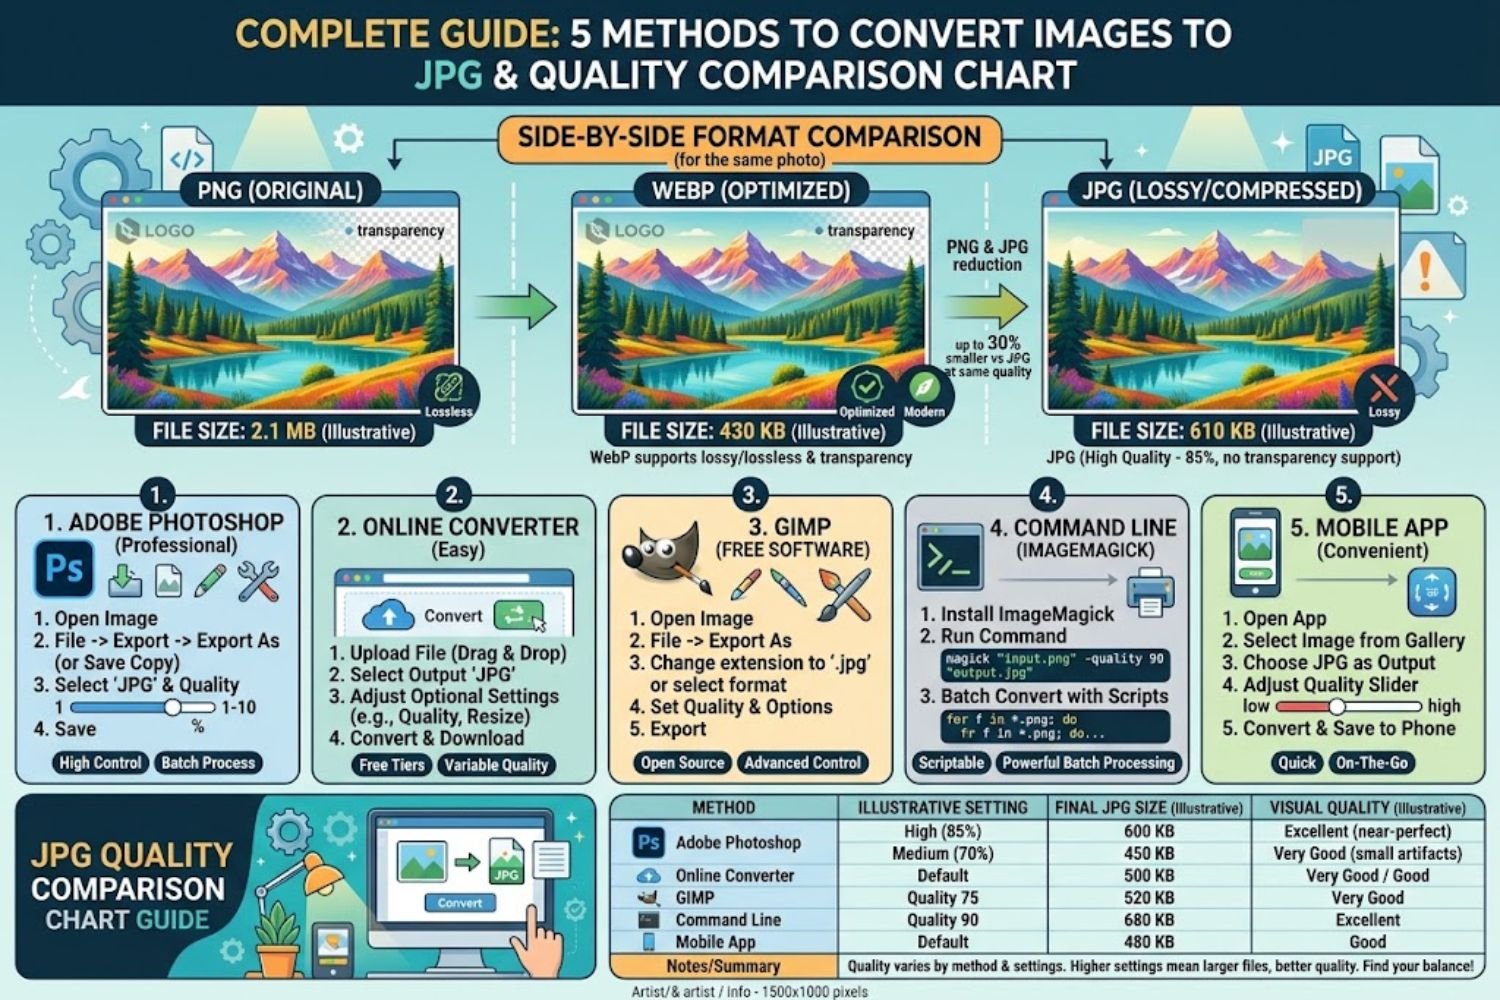
JPG is a compressed image format. More specifically, it uses lossy compression, meaning some image data is intentionally discarded to reduce file size. This might sound bad—and it can be if done wrong—but it’s actually brilliant engineering.
The algorithm prioritizes removing the information your eye can’t easily perceive. For photographs and complex images with lots of color gradients, this works beautifully. A family vacation photo compressed to JPG at 80-90% quality is nearly indistinguishable from the original, yet the file might be 5-10 times smaller.
PNG, by contrast, uses lossless compression. Every pixel is preserved perfectly. That’s excellent for graphics with sharp lines, solid colors, and transparency, but it results in much larger files for photographs.
The key insight: JPG compression trades a tiny bit of perceptible quality for dramatic file size reduction. For web use, email, and sharing, that’s almost always the right trade-off.
Why JPG Became the Web Standard
JPG dominates because it solves a real problem: bandwidth and storage.
In the 1990s, when internet speeds were measured in kilobits, smaller files mattered desperately. JPG format made it possible to share quality photographs without waiting 20 minutes for downloads. Today, even with faster connections, JPG remains standard because every device, browser, and software application supports it flawlessly.
PNG is great—but not every legacy device supports it. WebP is modern and more efficient—but older browsers can’t open it. JPG? It works everywhere. That universal compatibility is why photographers, marketers, and everyday users still convert to JPG.
JPG vs PNG vs WebP: When to Convert to JPG
Not every image should be JPG. Understanding when to convert—and when not to—is crucial.
Convert to JPG when:
- You have photographs or images with gradual color transitions
- File size matters (web pages, email attachments, cloud storage)
- You need maximum compatibility across devices and software
- You’re publishing content for the general web audience
Skip JPG and use PNG instead for:
- Graphics with sharp lines, logos, or solid colors
- Images that need transparency (your background will lose it in JPG)
- Screenshots or images where every pixel must be perfect
- Archival purposes where no quality loss is acceptable
Use WebP for:
- Modern websites where you’re okay with older browsers seeing PNG fallbacks
- Google services and platforms that prioritize speed
- When you want better compression than JPG without transparency needs
For this guide, we’re assuming you have a good reason to convert to JPG. Let’s get into how.
5 Ways to Convert Images to JPG
You have multiple options. Each has advantages depending on your situation, files, and priorities.
Method 1: Online Converters (Fastest)
Best for: Quick one-off conversions, no software installation needed, works on any device
Online converters are the path of least resistance. Upload a file, click convert, download the result. They’re fast, require nothing to install, and work on Mac, Windows, and Linux equally well.
Popular options include: Img2Go, OnlineConvert, Zamzar, and convertcase.net
Step-by-step:
- Open your browser and navigate to a converter site
- Click the upload area or drag your image into it
- Select JPG as the output format
- Adjust quality settings if the tool offers them (usually 75-95% is good)
- Click Convert and wait for processing
- Download your new JPG file
The catch: Online converters upload your files to their servers. If privacy matters—for sensitive business documents, client work, or confidential images—this is a problem. Most reputable converters delete files automatically after 30-60 minutes, but there’s always a theoretical risk.
For personal photos, screenshots, and non-sensitive work, this is the easiest path.
Method 2: Built-in Windows Tools (Free & Instant)
Best for: Windows users who want zero installation, maximum privacy, offline conversion
Windows includes a free, built-in tool: Paint. It’s basic and old, but it’s installed on every Windows machine and handles conversions perfectly.
Step-by-step:
- Right-click your image file
- Select “Open with” → “Paint”
- Go to File → Save As
- In the dropdown menu, select “JPEG Image (*.jpg)”
- Choose your save location
- Click Save
That’s it. No internet required, your file never leaves your computer, and the conversion is instant. The downside: Paint doesn’t give you quality controls. It uses a default compression setting that’s usually fine but not always optimal.
Advanced tip: If Paint’s compression isn’t quite right, use Windows Photos app instead. Go to File → Export → Change format to JPG. You’ll get slightly better control over the output.
Method 3: macOS Preview (Native Solution)
Best for: Mac users wanting built-in convenience without third-party software
macOS Preview is one of Apple’s under-appreciated tools. It opens images, edits them slightly, and converts formats—all without additional software.
Step-by-step:
- Right-click your image → Open With → Preview
- Go to File → Export
- In the format dropdown, select JPG (JPEG)
- Adjust the quality slider if desired (higher = better quality, larger file)
- Choose your save location
- Click Save
Preview gives you more control than Windows Paint. The quality slider matters here—dragging it to maximum (100%) creates a much larger file with nearly no quality loss, while sliding to minimum creates tiny files with visible compression artifacts.
Pro tip: Preview also lets you resize images before converting. If you’re converting for web, use Tools → Adjust Size to set optimal dimensions first, then export as JPG.
Method 4: Adobe Photoshop (Professional Control)
Best for: Designers and professionals who need pixel-perfect control and advanced options
Photoshop is overkill for casual conversion, but if you already have it and need professional results, it’s powerful.
Step-by-step:
- Open your image: File → Open
- Go to File → Export As
- Choose your filename and set format to JPG
- Click Export
- In the JPG dialog box, adjust:
- Quality (0-100, where 12 is maximum compression, 100 is maximum quality)
- Progressive encoding (makes images display progressively as they download)
- Baseline (standard) or Progressive (for web optimization)
- Click Export
The advantage here is control. You can see a preview of quality settings in real-time, adjust color profile, preserve metadata, and fine-tune exactly how the compression works.
The disadvantage: Photoshop costs money ($20/month or $600+ one-time), and it’s unnecessary for most conversions.
Method 5: Batch Conversion Software (Multiple Files)
Best for: Converting dozens or hundreds of images at once
If you’re converting a photo library, camera roll, or batch of screenshots, doing them one-by-one is brutal. Batch conversion software handles this in minutes.
Popular options:
- XnConvert (free, cross-platform)
- ImageMagick (command-line, advanced users)
- FastStone Image Resizer (Windows, great interface)
- Bulk Image Converter (simple, free)
General process:
- Download and install your chosen tool
- Select all images you want to convert
- Set output format to JPG
- Set output quality and folder
- Click “Start” or “Convert All”
- Wait for batch processing to complete
Batch conversion saves hours when working with 50+ images. A photographer converting a 200-image wedding shoot from camera RAW to JPG? Batch conversion is mandatory.
Step-by-Step Conversion Methods
The above five methods cover the tools. Now let’s address specific scenarios you’ll encounter.
Convert PNG to JPG (Most Common)
PNG and JPG have a contentious relationship. PNG is technically superior (lossless, supports transparency), but JPG is smaller and more universal. Converting PNG to JPG is the most common image conversion task, especially for web designers.
Important caveat: If your PNG has a transparent background, JPG will replace that transparency with a solid color (usually white). If that’s not what you want, use PNG instead.
Step-by-step (using online converter as example):
- Open your preferred converter
- Upload your PNG file
- Select JPG/JPEG as the output format
- Check if it offers a “background color” option for transparency
- Set quality to 85-90% (PNG already compresses, so aggressive re-compression isn’t necessary)
- Click Convert and download
The file size reduction is usually dramatic. A 500KB PNG often becomes a 50-100KB JPG, with quality loss that’s barely perceptible to human eyes.
Convert WebP to JPG (Modern Formats)
WebP is Google’s modern image format. It’s smaller and more efficient than both PNG and JPG, but older devices and software don’t support it. You might need to convert WebP to JPG for compatibility.
Where you’ll encounter WebP:
- Downloaded from Google services
- Exported from newer design tools
- Some modern websites (Chrome and edge browsers handle WebP, but Firefox doesn’t)
Step-by-step:
- Use an online converter that supports WebP (most modern ones do)
- Upload your WebP file
- Select JPG as output
- Quality typically doesn’t matter much—WebP is already compressed efficiently
- Convert and download
Note: WebP→JPG conversions usually show minimal file size changes compared to PNG→JPG. The main purpose is compatibility, not space saving.
Convert PDF to JPG (Multi-Page Documents)
PDF to image conversion is less common but crucial when you need to share a document as images (old email systems, web displays, etc.).
Important: If your PDF has multiple pages, most converters create one JPG per page. You’ll get multiple files.
Step-by-step (online converter):
- Go to a PDF converter (must support PDF input)
- Upload your PDF file
- Select JPG as output format
- Set quality (85-90% is fine for documents)
- Choose whether to convert all pages or specific pages
- Click Convert
- Download each JPG file (or they may bundle as a ZIP)
Desktop alternative: Ghostscript is a command-line tool that converts PDFs to images. It’s free but requires technical knowledge.
Convert Multiple Images at Once (Batch Conversion)
You’ve got 47 PNG screenshots from client mockups, and they all need to be JPG.
One-by-one conversion would take 30 minutes. Batch conversion takes 2 minutes.
Using XnConvert (free, recommended):
- Download XnConvert from xnconvert.com
- Open the application
- Click “Open” and select all images you want to convert
- Go to “Output” tab
- Select the output folder
- Under “Format,” choose JPG
- Under “Export Options,” set quality to 85-90
- Click “Convert” → “Start”
The software processes all images and saves them to your output folder in minutes.
Quality vs File Size: The Compression Trade-off
This is where most people stumble. The relationship between JPG quality and file size isn’t linear—it’s exponential in the wrong direction.
Understanding Lossy Compression Settings
When you convert to JPG, every tool offers a “quality” setting. This is really asking: “How much information can I discard?”
At 100% quality, JPG applies minimal compression. File sizes are large but image fidelity is near-perfect.
At 1% quality, JPG applies maximum compression. Files are tiny but look like abstract art.
The compression is lossy, meaning those discarded pixels are gone forever. You can’t “undo” over-compression by re-opening the file later. The damage is permanent.
Quality Levels Explained (70%, 80%, 90%, 100%)
Here’s what different quality settings actually look like in practice:
90-100% Quality:
- Use for: Fine art, professional photography, print materials
- File size: Large (often 50-100% of PNG equivalent)
- Visible loss: None to imperceptible
- Note: For photographs, even 90% looks virtually identical to 100%
80-90% Quality:
- Use for: Web photos, portfolio images, professional websites
- File size: Medium (20-50% of PNG)
- Visible loss: Imperceptible to the human eye unless you’re pixel-peeping
- Recommendation: This is the sweet spot for most uses
70-80% Quality:
- Use for: General web use, thumbnail images, social media
- File size: Small (10-30% of PNG)
- Visible loss: Minimal but starting to become visible on large displays
- Note: Compression artifacts appear in areas with sharp color transitions
Below 70% Quality:
- Use for: Email thumbnails, low-bandwidth scenarios
- File size: Very small (under 15% of PNG)
- Visible loss: Obviously compressed, visible artifacts
- Warning: Typically not recommended unless storage is genuinely critical
How to Find Your Sweet Spot
The ideal quality setting depends on your use case. Follow this framework:
For web images:
- Photograph content (products, portraits, art): 85%
- Blog post images: 80%
- Thumbnails: 70%
For email:
- Attachment to important email: 85%
- Newsletter images: 75%
For social media:
- Instagram, Facebook, Twitter: 75% (platform compression will happen anyway)
- Profile pictures: 85%
For print:
- Avoid converting to JPG if possible—use PNG or TIFF
- If required, use 95%+ to minimize loss
Quick test: Export your image at 85%. If it looks perfect to you, try 75%. If 75% still looks good, you’ve found your sweet spot. The process takes 30 seconds per image and saves substantial file space.
Common Mistakes and How to Avoid Them
Years of helping people with image conversion reveals patterns. These mistakes cause frustration and wasted time.
Mistake #1: Over-Compressing and Losing Detail
The problem: Someone sets quality to 50% to get the smallest possible file, creating a pixelated, blocky mess.
Why it happens: They don’t realize how much quality loss 50% quality causes until the damage is done.
The fix: Start at 85%. Go lower only if storage is genuinely critical. For most uses, 80-85% is ideal.
Reality check: A high-quality photograph at 85% JPG is usually 100KB-200KB. The difference between 85% and 50% might be 50KB of savings—not worth the visual degradation for most purposes.
Mistake #2: Converting Transparent Images Without Checking
The problem: You convert a PNG with transparency to JPG, and suddenly your image has a white (or black) background.
Why it happens: JPG doesn’t support transparency. The converter fills the transparent area with a default color, and you don’t notice until the file is already converted.
The fix: Before converting transparent PNGs, ask yourself: “Do I need transparency?” If yes, stick with PNG. If no, but you want a specific background color, some converters let you choose the background color before conversion.
Workaround: If you’ve already converted and want to fix it, you’ll need to edit the PNG again and re-convert (or use image editing software to add the background before conversion).
Mistake #3: Batch Converting Without Quality Checking
The problem: You batch convert 200 images, only to discover they’re all over-compressed.
Why it happens: You set the quality once and assumed it would be fine for all images, but a screenshot compresses differently than a photograph.
The fix: Convert 3-5 sample images first. Check the results. Only after you’re satisfied with quality and file size should you batch convert everything.
Pro tip: Different image types compress differently. Photographs can handle aggressive compression (70-80%). Screenshots and graphics need higher quality (85-95%) to avoid artifacts.
Mistake #4: Ignoring Color Profile Changes
The problem: Your converted JPG looks slightly different in color—warmer, cooler, or more washed out than the original.
Why it happens: During compression, color profile information is sometimes altered or lost.
The fix: Use tools that preserve color profiles (like Photoshop, Preview on Mac, or advanced converters). Most online tools don’t preserve this, so stick with desktop tools if color accuracy is critical.
When it matters: Photography, design work, and professional graphics. For casual web use, it doesn’t matter.
Best Practices by Use Case
Converting to JPG isn’t one-size-fits-all. Different scenarios demand different approaches.
Converting for Web (Speed Optimization)
Web users care about fast load times. A 500KB image slowing down your page is a problem.
Best practices:
- Quality: 75-85% (platform compression will happen anyway)
- Resize to the actual display size (don’t upload a 4000px image to display at 800px)
- Consider dimensions: 1200px width is good for web headers
- Use compression tools like TinyJPG to further reduce size without visible quality loss
Real example: A product photo for e-commerce: 1200px wide, 85% quality, 120KB file. Loads instantly, looks sharp. Perfect.
Converting for Email (Compatibility)
Email clients are inconsistent. Some render images beautifully; others destroy quality.
Best practices:
- Quality: 80-85% (email compression adds to any loss)
- Keep file sizes under 500KB total per email
- Use height/width attributes in HTML to prevent stretching
- Resize images to reasonable dimensions (max 800px width)
Why it matters: Gmail, Outlook, and Apple Mail render images differently. Going with slightly higher quality (85%) ensures it looks acceptable in all clients.
Converting for Print (Resolution Matters)
Here’s where JPG gets tricky. Print requires high resolution (300 DPI minimum). When converting for print, quality must be maximum.
Best practices:
- Stick with PNG or TIFF if possible—print should be lossless
- If you must use JPG, set quality to 95-100%
- Ensure resolution is at least 300 DPI
- Use CMYK color space if possible (not RGB)
Reality: Most photos destined for print should stay as RAW or TIFF. JPG compression is okay for final web proofs, but not for actual printing.
Converting for Social Media (Platform Optimization)
Social platforms (Instagram, Facebook, TikTok) re-compress uploaded images anyway. Your compression doesn’t matter as much.
Best practices:
- Quality: 75-80% (platform will compress further)
- Check platform requirements:
- Instagram: Up to 8MB, accepts JPG and PNG
- Facebook: Up to 4MB, compresses heavily
- Twitter: Up to 15MB
- Aspect ratio matters more than compression—use platform’s recommended dimensions
Insight: If Instagram is re-compressing your images anyway, spending effort on perfect quality is wasted. 75% is fine.
Advanced Tips: Metadata, Color Spaces & DPI
You don’t need to know this for casual conversions. But if you’re working professionally, these factors affect your results.
Preserving EXIF Data During Conversion
EXIF data is metadata embedded in images: camera model, lens, aperture, shutter speed, GPS location, etc.
When you convert to JPG, some tools strip this data by default. If you need to preserve it:
Desktop tools:
- Adobe Photoshop: Automatically preserves metadata
- macOS Preview: Check “Include options” before exporting
- Windows Paint: Doesn’t preserve metadata
Online tools:
- Most strip metadata by default for privacy
- If you need to preserve it, use desktop software
When it matters: Professional photography portfolios, legal documentation with timestamps, stock photo licensing.
For casual use: You don’t need EXIF. It just adds file size.
Color Space Considerations
Images exist in color spaces (RGB, CMYK, sRGB, Adobe RGB). Conversion can shift colors if color spaces aren’t matched.
RGB (most common)
- Used for web, email, digital displays
- Default for almost everything
CMYK (print-specific)
- Used for print publications
- Not supported by JPG on the web
- Convert from CMYK to RGB before creating JPG for web
sRGB vs Adobe RGB
- sRGB: Smaller color range, more consistent across devices
- Adobe RGB: Larger color range, for professional color work
- For web, sRGB is standard
How it affects conversion: If you convert from Adobe RGB to JPG without specifying sRGB, colors may look less vibrant on most displays. Use tools that let you choose the output color space.
Understanding DPI and Resolution Settings
DPI (dots per inch) is often confused with pixel dimensions. They’re different:
- Pixels = actual image dimensions (1200 x 800)
- DPI = how large those pixels print
- 72 DPI: Web standard (doesn’t matter for digital)
- 150 DPI: Acceptable for print
- 300 DPI: Professional print standard
For web: DPI literally doesn’t matter. A 1200×800 image displays as 1200×800 pixels. Period.
For print: DPI matters dramatically. A 1200×800 image at 300 DPI prints as 4″ x 2.67″ (1200÷300 = 4 inches). At 150 DPI, it prints as 8″ x 5.3″.
When converting: Most converters don’t touch DPI settings. If they do, ignore them unless you’re printing.
Security & Privacy When Converting Online
This is important and often overlooked. Online converters are convenient—but what happens to your file?
What Happens to Your Images?
Here’s the typical flow:
- You upload a file to converter.com
- Their server receives, processes, and converts your file
- The converted file is made available for download
- After a set time (usually 30-60 minutes), files are deleted from servers
- You delete your browser history
In theory, this is fine. In practice:
- Files exist on their servers for 30-60 minutes
- Server logs may contain metadata about your uploads
- If the service is hacked, files might be exposed
- Terms of service may permit some data retention beyond deletion
It’s not necessarily dangerous, but it’s a consideration.
Choosing Safe Converters
If you use online converters, pick ones with good reputations:
Reputable options:
- Img2Go (owned by Movavi, transparent privacy)
- OnlineConvert (long-standing service)
- Zamzar (established, clear privacy policy)
- Convertcase.net (no data retention, privacy-focused)
Red flags:
- Converters with no privacy policy
- Converters asking for account creation
- Services that claim “unlimited” conversions with catch
- Unknown or new services
When to Use Desktop Tools Instead
For sensitive files, always use desktop tools:
- Client confidential images
- Medical or legal documents
- Business photography
- Proprietary designs
- Anything you wouldn’t want on someone else’s servers
Use Windows Paint, macOS Preview, or free software like XnConvert. Your file never leaves your computer.
Troubleshooting Common Conversion Issues
Conversions usually work smoothly, but problems happen. Here’s how to diagnose and fix them.
“My JPG Quality Looks Worse Than Expected”
Likely causes:
- Quality setting was too low
- You’re comparing to the original at 100% zoom (artifacts are invisible at normal zoom)
- Your image was already compressed (second compression makes it worse)
Solutions:
- Re-convert at higher quality (try 90%)
- View the JPG at 100% zoom at normal viewing distance (1-2 feet from screen)
- If converting from PNG, the original PNG quality matters—garbage in, garbage out
Reality check: A photograph at 85% JPG quality looks identical to the original at normal viewing distance. If you can see quality loss, either your quality setting was too low, or your monitor is very close to your face.
“The File Size Didn’t Reduce Much”
Likely causes:
- Original image was already compressed
- Your quality setting is too high
- Image type (screenshots, graphics) doesn’t compress as well as photos
- You converted PNG→JPG, but the PNG was already small
Solutions:
- Try lower quality (75% instead of 85%)
- Check the original file size—if PNG was 80KB, JPG won’t shrink it much
- For screenshots and graphics, JPG may not be ideal—PNG might actually be smaller
Technical insight: JPG compression works best on photographs with gradual color transitions. Sharp lines and solid colors (screenshots, logos) don’t compress well with JPG—PNG is actually better for these.
“Color Banding or Artifacts Appeared”
What it is: Visible bands of color or pixelated areas that weren’t in the original.
Why it happens:
- Quality is too low, causing compression artifacts
- Original image had limited colors (applying JPG compression makes this worse)
- Converting from indexed color (GIF) to JPG—color loss is visible
Solutions:
- Increase quality to 85%+
- Consider sticking with PNG for images with limited colors
- Use online tools with preview capabilities—check before converting
Prevention: Always preview the conversion before committing if the tool allows it.
Frequently Asked Questions
Q: Is there a difference between JPG and JPEG?
A: No. JPG and JPEG are the same format. JPG is the shortened version. Both .jpg and .jpeg files are identical.
Q: Can I convert JPG to PNG without quality loss?
A: No, not truly. JPG is lossy—the quality loss is permanent. When you convert JPG→PNG, you’re not recovering lost data; you’re just changing the format. PNG will preserve whatever quality the JPG has, but can’t improve it.
Q: What’s the best quality setting for JPG?
A: For most uses, 80-85% is ideal. It’s barely perceptible to human eyes but creates significant file size savings. For print or professional work, use 90%+.
Q: Does converting JPG→PNG→JPG improve quality?
A: No. Each conversion that involves compression (like JPG) causes permanent data loss. Re-converting is worse, not better.
Q: Why do my images look washed out after conversion?
A: Likely a color space issue. Use tools that preserve color profiles (Photoshop, Preview, not most online converters). For casual use, the difference is usually imperceptible.
Q: Is it safe to use online image converters?
A: Generally yes, for non-sensitive images. Your file is uploaded to their server, converted, and deleted after 30-60 minutes. For confidential files, use desktop tools instead.
Q: Can I batch convert on Mac?
A: Yes. Use Preview (select multiple files), or use free software like XnConvert. ImageMagick is powerful but requires command-line knowledge.
Q: Do I need to worry about file metadata?
A: Only if you’re a photographer or doing professional work. For casual use, ignore it. EXIF data adds file size and isn’t necessary.
Q: What’s the maximum file size for JPG?
A: Technically up to 65,535 x 65,535 pixels. Practically, create images under 20,000 pixels on the longest edge. Most tools and devices struggle above that.
Q: Can I convert an animated GIF to JPG?
A: Yes, but you lose animation. JPG only captures the first frame. If you need animation, stay with GIF or use animated WebP/PNG instead.
Q: Why do online converters take so long sometimes?
A: Usually server load or processing of large files. A 50MB file takes longer than a 1MB file. If it’s taking more than 5 minutes, it’s likely stalled—try again.
Q: Should I compress JPG files after conversion?
A: Yes, optionally. Services like TinyJPG can reduce file size by 10-30% without visible quality loss. Recommended for web images.
Q: What’s the difference between “Baseline” and “Progressive” JPG?
A: Baseline JPG displays line-by-line as it downloads. Progressive JPG displays blurry first, then sharpens. Progressive is better for web but slightly larger. For most uses, it doesn’t matter.
Q: Can I convert SVG to JPG?
A: Yes. SVG (vector) converts to JPG (raster) fine, but you lose the scalability advantage of SVG. Use only when necessary.