You have a PNG image. It’s 5MB. You need it on your website, in an email, or on social media. A PNG might work, but should you convert it to JPG? And if you do, what happens to quality?
The answer isn’t simple—it depends on what the image contains, where it’s going, and what you’re optimizing for.
This guide covers everything you need to know: the technical differences, when conversion makes sense, how to do it properly, and the mistakes most people make.
What’s the Difference Between PNG and JPG?
PNG and JPG are fundamentally different image formats designed for different purposes. Understanding these differences is the foundation of making the right conversion decision.
PNG Format Explained (Lossless Compression)
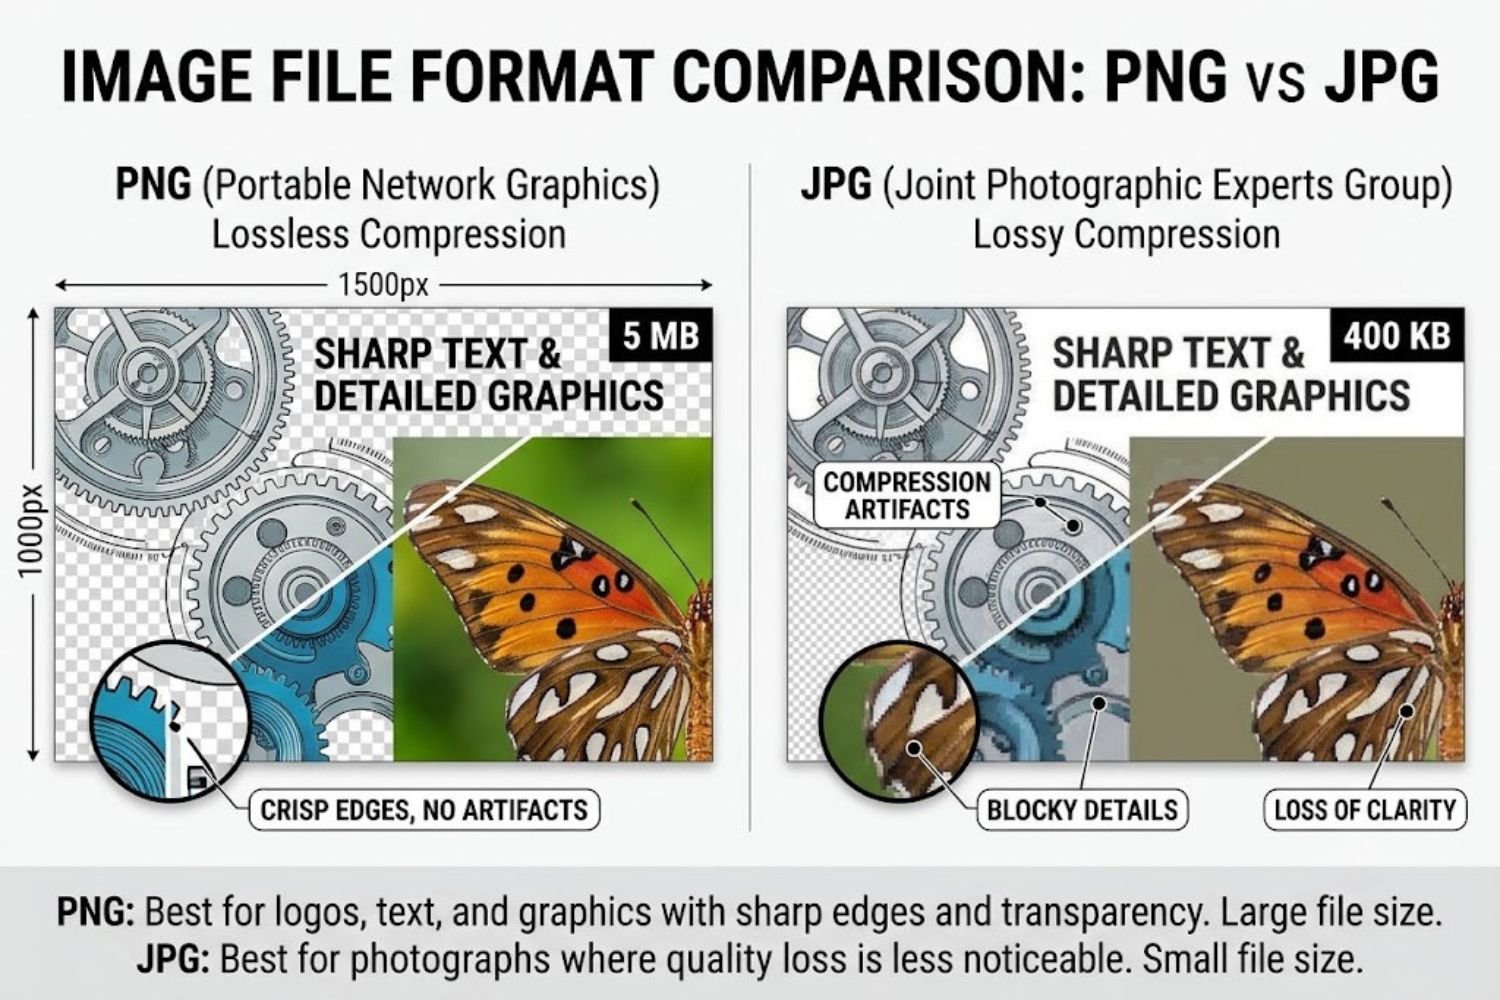
PNG stands for Portable Network Graphic. It uses lossless compression, meaning no image information is discarded during the encoding process. What you see is exactly what you get—every pixel remains intact.
Here’s what makes PNG unique:
- Lossless compression: No data loss, ever
- Transparency support: Full alpha channel for transparent backgrounds
- Color depth: Supports up to 48-bit color (16 bits per channel)
- Best for: Graphics, screenshots, illustrations, logos, images with text
- File sizes: Larger (typically 2–10MB for typical web images)
- Quality guarantee: Zero degradation, regardless of edits
PNG was created in 1996 specifically to replace GIF and provide a better format for web graphics. If you need a transparent background or perfect clarity, PNG is the standard choice.
JPG Format Explained (Lossy Compression)
JPG (or JPEG—Joint Photographic Experts Group) uses lossy compression. This means some image information is permanently removed to reduce file size. The algorithm discards data that the human eye typically can’t perceive.
Here’s what defines JPG:
- Lossy compression: Intentional data removal for smaller files
- No transparency: Solid background only (usually white)
- Color depth: 24-bit color (8 bits per channel)
- Best for: Photographs, complex images with gradients, realistic imagery
- File sizes: Smaller (typically 100KB–2MB for web images)
- Quality range: Adjustable (1–100% quality settings)
JPG dominates because photographs contain millions of color variations and subtle gradients. Removing some of this data is imperceptible to viewers but creates dramatic file size reductions.
Quick Comparison Table
| Feature | PNG | JPG |
|---|---|---|
| Compression Type | Lossless (no data loss) | Lossy (data removal) |
| File Size | Large (2–10MB typical) | Small (100KB–2MB typical) |
| Transparency | ✓ Full support | ✗ Not supported |
| Best For | Graphics, logos, text, illustrations | Photographs, complex imagery |
| Quality Loss | None | Variable (based on settings) |
| Color Depth | Up to 48-bit | 24-bit |
| Editing Friendly | Yes (no degradation on re-save) | No (quality loss with each edit) |
| Web Performance | Slower loading | Faster loading |
| Browser Support | 100% (all modern browsers) | 100% (all modern browsers) |
When Should You Convert PNG to JPG?
Conversion makes sense in specific scenarios. Converting blindly leads to unnecessary quality loss or missed optimization opportunities.
File Size Reduction (Primary Benefit)
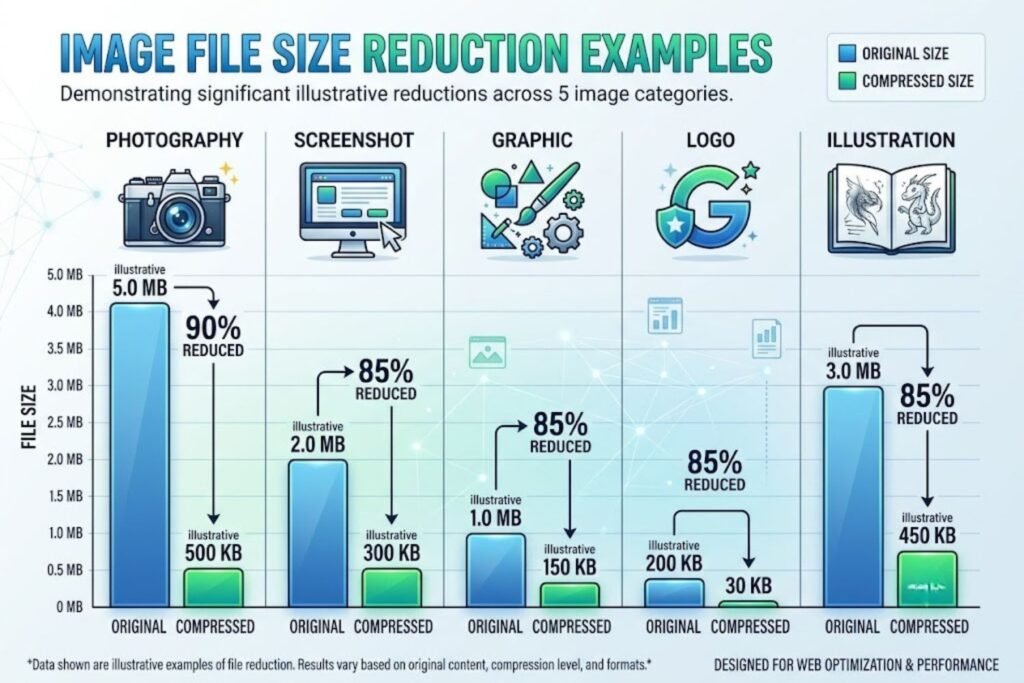
The most obvious reason to convert is file size. A photograph saved as PNG might be 8MB. The same image as JPG could be 400KB—a 95% reduction.
Here’s why this matters:
Web Performance: Every kilobyte affects load time. A 1-second page delay costs an average e-commerce site 7% in conversions.
Mobile users: 60% of web traffic comes from mobile. Large files mean slow downloads, higher data charges, and user frustration.
Storage costs: If you host 10,000 images, format choice directly impacts your storage bills.
Bandwidth constraints: CDN pricing scales with data transfer. Smaller files = lower costs.
Real-world example: A fashion e-commerce site had 50,000 product photos as PNG (averaging 4MB each). Converting to JPG reduced total storage from 200GB to 12GB and cut bandwidth costs by 75%.
Web Performance & Core Web Vitals
Google’s Core Web Vitals directly affect rankings. Image format choice impacts three key metrics:
Largest Contentful Paint (LCP): If your hero image is 5MB PNG, it won’t load fast. JPG loads 10–20x faster. Faster LCP = better rankings.
Cumulative Layout Shift (CLS): If images load late, page elements shift around. Smaller JPG files load earlier, preventing layout shifts.
First Input Delay (FID): Less data to process = faster browser response time.
Google’s PageSpeed Insights specifically recommends converting PNGs to modern formats (JPG, WebP) for photographs. This is a direct signal that format matters for SEO.
Compatibility & Device Support
While both formats are universally supported, JPG works better in certain contexts:
- Email clients: Some email systems handle JPG better than PNG
- Legacy software: Older tools sometimes struggle with PNG
- Print workflows: Professional printing typically uses JPG
- Certain platforms: Some social media optimizations favor JPG
Use Case Scenarios
When to convert PNG → JPG:
- Photography: Any real-world photo (people, landscapes, products)
- Complex gradients: Images with smooth color transitions
- High-resolution images: Over 4000×4000 pixels
- Social media: Instagram, Facebook, Twitter performance optimization
- Email campaigns: Faster loading in inboxes
- Website galleries: Product images, portfolio sites
- Batch processing: Need to resize and optimize hundreds of images
When NOT to convert PNG → JPG:
- Graphics with text: Text becomes blurry and compressed
- Icons and logos: Sharp edges become fuzzy artifacts
- Screenshots: Text, UI elements, sharp lines get compression artifacts
- Transparent backgrounds required: No alternative for transparency
- Professional/archival work: Original quality matters more than file size
- Images with sharp lines: Diagrams, technical drawings, wireframes
- Original source files: Keep originals in PNG; convert copies for web
Decision rule: If an image contains text, sharp edges, or needs transparency—keep it PNG. If it’s a photograph or has soft gradients—convert to JPG.
What Happens During PNG to JPG Conversion?
Understanding the technical process helps you anticipate and prevent problems.
Lossy Compression Process
When you convert PNG to JPG, several things happen simultaneously:
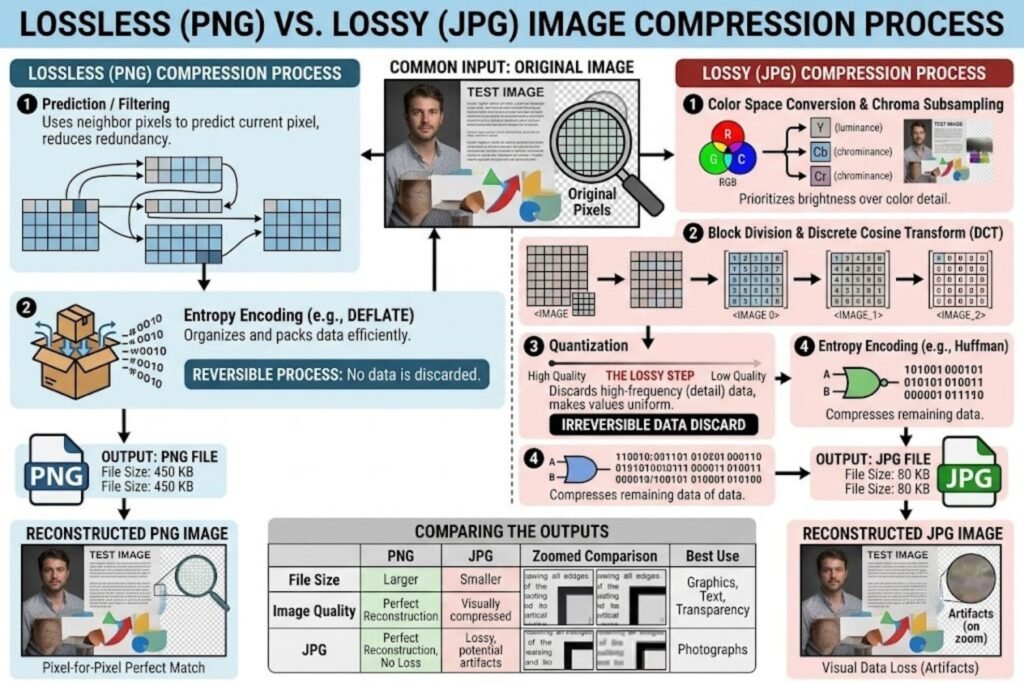
Step 1: Color Space Conversion PNG uses RGB color space. JPG converts this to YCbCr (luma and chroma values). This is invisible to humans but allows more efficient compression.
Step 2: DCT (Discrete Cosine Transform) JPG divides the image into 8×8 pixel blocks and applies mathematical compression to each block. The algorithm identifies patterns that human eyes are less sensitive to.
Step 3: Quantization The algorithm removes color information from areas humans perceive less. For example, we’re more sensitive to brightness changes than subtle color shifts. JPG removes some color precision while maintaining brightness.
Step 4: Huffman Coding The algorithm applies statistical compression to the remaining data, further reducing file size.
Step 5: Transparency Handling Any transparent pixels are replaced with a solid background (usually white). If your PNG has a transparent background and important details near the edges, this can create white halos or wash out colors.
Quality Loss & Visual Impact
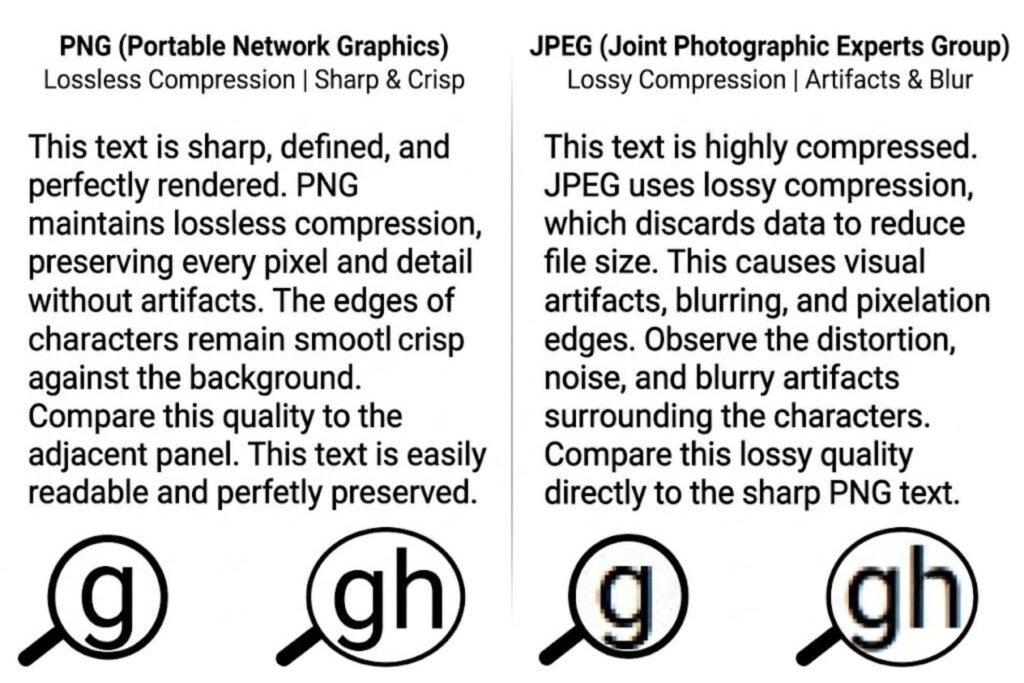
Quality loss appears as “compression artifacts”—visual distortions that become more noticeable at lower quality settings.
Common artifacts:
- Banding: Smooth gradients appear as distinct bands of color
- Blocking: Visible 8×8 pixel blocks, especially in smooth areas
- Ringing: Halos around sharp edges and text
- Blurriness: Fine details become soft
- Color fringing: Colored fringes appear around high-contrast edges
These are most noticeable in:
- Text and small fonts
- Diagrams with thin lines
- Smooth gradients (skies, backgrounds)
- High-contrast areas
Quality setting impact:
- 90% quality: Nearly imperceptible loss, good for most uses
- 75% quality: Slight loss visible on close inspection
- 60% quality: Clear quality loss for most images
- 40% quality or lower: Severe artifacts, blocky appearance
For photography, 85–90% quality is standard. You get 50–80% file size reduction with almost no visible quality loss.
Transparency Handling
PNG’s transparency doesn’t exist in JPG. Here’s what actually happens:
Scenario 1: Solid background If your PNG has a white background, conversion is perfect. No visible change.
Scenario 2: Transparent background The converter adds white (or another color) to fill transparency. If your image has sharp edges against transparent space, you’ll see a white halo.
Scenario 3: Feathered/anti-aliased edges If edges fade gradually into transparency (common for photos), the converter fills with solid color. Anti-aliased edges look fine, but sharp transparency-to-content boundaries become ugly.
Solution: When converting images with transparency, manually add a matching background color before conversion. This prevents white halos and ensures clean edges.
Color Space Conversion
PNG’s RGB to JPG’s YCbCr conversion is automatic and usually invisible. However, if your PNG uses an unusual color profile (Adobe RGB, ProPhoto), the conversion might shift colors slightly.
Solution for professionals: Verify color accuracy by comparing the original and converted versions side-by-side on a calibrated monitor. If critical, use desktop software with color management rather than basic online converters.
How to Convert PNG to JPG (Methods & Tools)
Multiple tools and methods exist, each with trade-offs.
Online Converters (Pros & Cons)
Online tools (png2jpg.com, FreeConvert, ILoveImg, Canva) require no installation.
Advantages:
- Instant access, no software download
- Handles batch conversions (5–50 files)
- Adjustable quality settings
- Privacy: Files deleted after conversion
Disadvantages:
- File size limits (typically 100MB–2GB)
- No color management features
- Slower for large batches (>100 files)
- Depends on internet connection
- No advanced features (layers, profiles, batch automation)
Best for: Quick conversions, small batches, casual users
Recommendation: Use online converters for one-off conversions or testing. For professional work or batch processing, use desktop software.
Desktop Software Options
Professional software gives you full control over conversion parameters.
Adobe Photoshop:
- Full control over quality and color settings
- Batch processing via scripts
- Color management and profiles
- Cost: $10–55/month
IrfanView (Windows):
- Free, lightweight
- Batch processing built-in
- Adjustable quality
- No advanced color management
XnConvert:
- Free for personal use
- Powerful batch processing
- 90+ formats supported
- Multi-threading for speed
ImageMagick (Command Line):
bash
convert image.png -quality 85 image.jpg- Free and open-source
- Automation-friendly
- Requires technical knowledge
GIMP:
- Free and open-source
- Full editing capabilities
- Batch processing possible (via plugins)
Command Line & Automation
For developers and power users, command-line tools enable automation.
ImageMagick (recommended):
bash
# Single file
convert input.png -quality 85 output.jpg

# Batch process folder
for file in *.png; do convert "$file" -quality 85 "${file%.png}.jpg"; done

# Resize and convert
convert input.png -resize 1920x1080 -quality 85 output.jpg
GraphicsMagick:
bash
gm convert input.png -quality 85 output.jpgFFmpeg:
bash
ffmpeg -i input.png -q:v 2 output.jpgBatch Processing Workflows
When converting hundreds or thousands of images, automation is essential.
Workflow example (XnConvert):
- Add all PNG files (drag & drop folder)
- Set format output: JPG
- Set quality: 85
- Set destination folder
- Click “Convert”
- XnConvert processes automatically (multi-threaded)
Workflow example (GIMP + Script-Fu):
- Write Script-Fu script for conversion
- Run via GIMP’s batch mode
- Outputs all JPGs to destination folder
Workflow example (Zapier/Make.com automation):
- Upload PNG to Google Drive
- Automation triggers conversion (via Make.com)
- JPG saves to Drive automatically
- Forwards converted file via email
Platform-Specific Solutions
WordPress:
- Plugins (ShortPixel, Imagify, Smush) auto-convert on upload
- Settings: Adjust quality and format preferences
Shopify:
- Built-in image optimization (converts to WebP and JPG)
- No manual action required
AWS S3 + Lambda:
- Upload PNG to S3
- Lambda function auto-converts using ImageMagick
- Stores JPG in destination bucket
Best Practices for PNG to JPG Conversion
Converting correctly prevents quality loss, file size bloat, and visual problems.
Quality Settings Guide
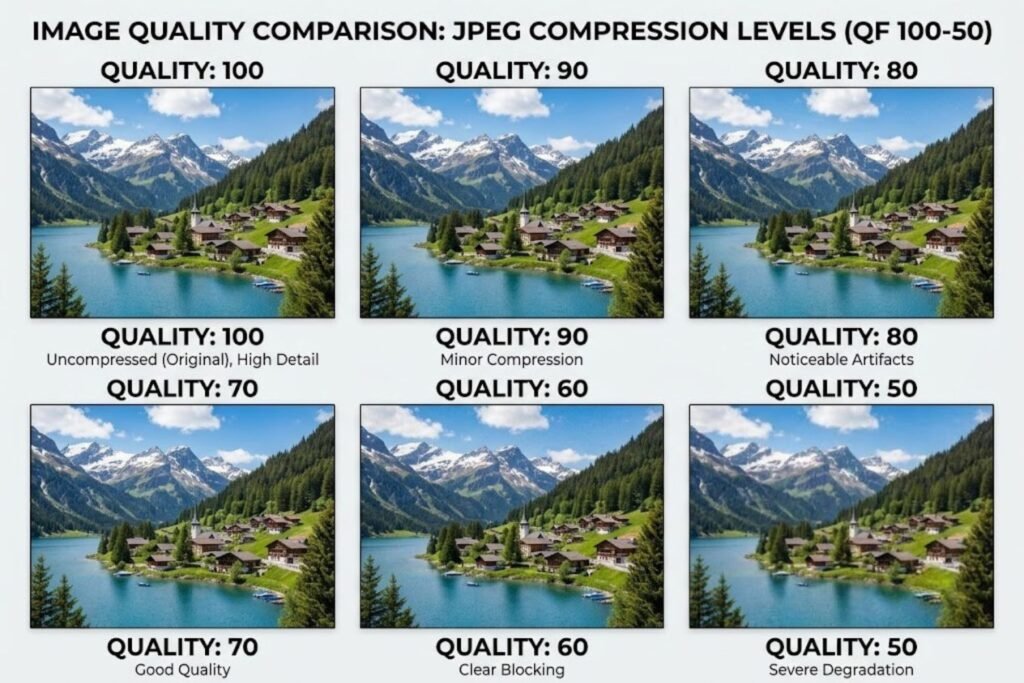
For photography:
- High quality (90–95%): Professional portfolio, e-commerce products, printing
- Medium quality (80–85%): Social media, website galleries, email
- Standard quality (75%): Blog posts, casual use
For graphics with some photographic elements:
- 85–90%: Safe default, imperceptible loss
Testing approach:
- Export at 90% quality
- Compare original vs. converted side-by-side (100% zoom)
- Check text, edges, and smooth gradients
- Reduce quality by 5% increments until artifacts appear
- Use the highest quality where artifacts are invisible
Handling Transparency Properly
Method 1: Background matching
- Identify the background color of your webpage/design
- Add this color to the PNG before conversion (in Photoshop, flatten image)
- Convert to JPG
- Result: Seamless integration, no white halos
Method 2: Keep PNG for transparency If transparency is essential, don’t convert. Use PNG or consider modern formats (WebP with transparency).
Method 3: Feather edges For images with soft edges, ensure edges are anti-aliased. The JPG algorithm handles feathered edges better than sharp transparency boundaries.
Preprocessing Tips
Before converting, optimize the source PNG:
Reduce image dimensions:
- You don’t need 4000×3000 if it displays at 1200×900
- Resizing before conversion saves even more space
- Resize to exact display size + 2x for retina displays
Remove metadata:
- Most PNGs include unnecessary metadata (EXIF, creation date, color profiles)
- Stripping metadata saves 50–200KB per image
- Tools: ExifTool, IrfanView
Optimize PNG first:
- Use PNGCrush or OptiPNG to reduce PNG size
- Better compressed PNG = smaller JPG conversion
- Can save an additional 10–20%
Color space check:
- Ensure PNG uses standard RGB (not CMYK)
- If printing, convert to CMYK after JPG (or use source PNG)
Common Mistakes to Avoid
Mistake 1: Converting already-compressed images
- Don’t convert JPG → PNG → JPG (double compression)
- If you only have the JPG, work with that
Mistake 2: Quality set too low
- Saving at 50% quality to save 100KB is false economy
- Ugly image drives users away
- Use 80%+ for public-facing images
Mistake 3: Ignoring transparency issues
- Converting PNG with transparent background without addressing it
- Results in ugly white halos
- Always flatten or add background first
Mistake 4: Using wrong tool for use case
- Using online converter for 5000 batch conversion (should automate)
- Using desktop software for one-off image (should use online tool)
Mistake 5: Not testing quality
- Converting and uploading without comparison
- Discovering artifacts after deployment
- Always preview before finalization
Mistake 6: Converting images that shouldn’t be converted
- Converting logos, icons, or graphics with text
- Result: Blurry, unusable images
- Keep these as PNG
Mistake 7: Assuming all JPGs look the same
- JPG quality varies wildly based on settings
- Always specify quality setting, not just “convert to JPG”
Testing & Validation
After conversion, validate quality:
Visual inspection:
- Open converted JPG and original PNG
- Zoom to 100% (actual pixels)
- Inspect text, edges, and gradients
- Look for artifacts, banding, or halos
- Compare file sizes
Automated testing (web performance):
bash
# Using ImageMagick to compare
compare original.png converted.jpg difference.jpg

# Check file sizes
ls -lh original.png converted.jpg
Browser testing:
- Upload JPG to website
- Test on mobile (where quality issues show more)
- Test on high-DPI displays (retina)
- Ensure no visible quality loss
PNG to JPG Conversion Decision Framework
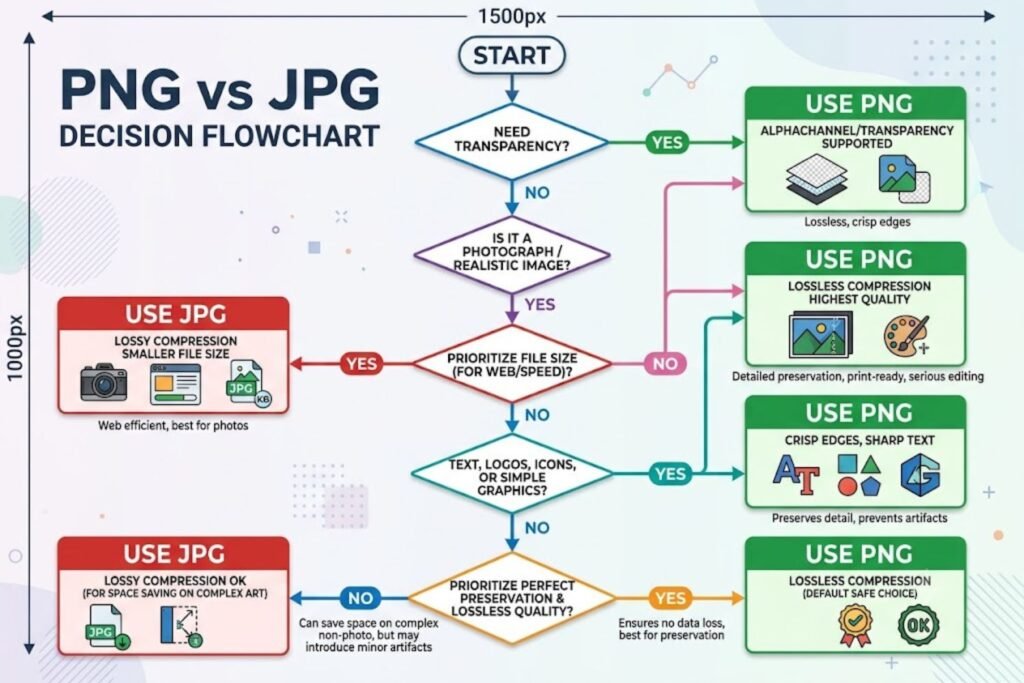
Unsure whether to convert? Use this framework.
Image Type Assessment
Photograph or realistic image?
- YES → JPG is ideal, convert with 85–90% quality
- NO → Go to next question
Contains text or sharp lines?
- YES → Keep PNG (text will blur)
- NO → Go to next question
Needs transparent background?
- YES → Keep PNG (JPG doesn’t support transparency)
- NO → Go to next question
Smooth gradients or soft colors?
- YES → JPG handles these well, convert
- NO → Go to next question
Small graphic (icon, logo)?
- YES → Keep PNG (JPG adds artifacts)
- NO → Proceed to Use Case Evaluation
Use Case Evaluation
Website product image? → Convert to JPG (85% quality) + WebP alternative
Social media post? → Convert to JPG (80% quality) per platform recommendations
Email newsletter? → Convert to JPG (85% quality) for smaller file sizes
Print material? → Keep PNG or original (printing requires full quality)
Archival/professional portfolio? → Keep PNG (original quality matters)
Blog post illustration? → Keep PNG if contains text; Convert if photograph
E-commerce product (fashion, jewelry)? → Convert to JPG (90% quality) for detail clarity
User-generated content? → Convert to JPG (75–80% quality) to reduce storage
Decision Matrix
| Image Type | File Size Critical? | Quality Critical? | Transparency Needed? | Recommendation |
|---|---|---|---|---|
| Photograph | Yes | Yes | No | Convert to JPG (85%) |
| Logo | No | Yes | Yes | Keep PNG |
| Screenshot | No | Yes | No | Keep PNG |
| Social media | Yes | Medium | No | Convert to JPG (80%) |
| Graphic design | No | Yes | Yes | Keep PNG |
| Website gallery | Yes | Yes | No | Convert to JPG (85%) |
| Icon set | No | Yes | Yes | Keep PNG |
| Product image | Yes | Yes | No | Convert to JPG (90%) |
Impact on SEO & Web Performance
Image format directly affects rankings through technical signals.
Core Web Vitals & LCP
Google measures Largest Contentful Paint (LCP)—how fast the largest page element loads. If your hero image is 5MB PNG, LCP will be slow.
Real example:
- E-commerce site: Hero image 5MB PNG → 2.8-second LCP
- After conversion: Same image 400KB JPG → 0.8-second LCP
- Result: 71% LCP improvement, ranking boost
Google’s Core Web Vitals directly influence rankings. Faster images = better rankings.
Page Load Speed Implications
Every 100ms delay costs 1% in conversions (Amazon study). Image optimization is the fastest ROI.
Impact breakdown:
- Image optimization: 50–70% of page speed improvements
- Format selection: 30–50% of image optimization
- JPG vs PNG on photography: 80–90% file size reduction
Real impact:
- Converting 50 images (avg 4MB PNG → 400KB JPG) reduces total page size by 180MB
- 180MB reduction = 3–5 seconds faster load time
- 3–5 seconds faster = 15–30% revenue increase (median)
Search Ranking Considerations
Google’s ranking factors include:
Page Speed: Confirmed ranking factor. Faster pages rank higher.
Core Web Vitals: 2021 update confirmed LCP, FID, CLS affect rankings directly.
Mobile Performance: 70% of searches are mobile. Mobile speed has weighted importance.
User Experience: Slow pages increase bounce rate, signaling poor experience to Google.
Image Format Optimization: Not a direct ranking signal, but enables all of the above.
Action: If you have product photographs in PNG format, converting to JPG is likely a quick SEO win. Check your site’s LCP score (Google PageSpeed Insights) before and after conversion.
Summary & Key Takeaways
PNG and JPG serve different purposes:
- PNG: Graphics, transparency, text, lossless
- JPG: Photographs, realistic images, file size, lossy
Convert PNG to JPG when:
- Image is a photograph or has soft gradients
- File size matters (web, email, social media)
- No transparency needed
- Quality at 85–90% is acceptable
Don’t convert when:
- Image contains text or sharp lines
- Transparency is required
- Original quality is critical
- Image is a logo, icon, or graphic
Technical best practices:
- Use 85–90% quality for photography
- Handle transparency by adding background color
- Preprocess: resize to actual display size, remove metadata
- Test quality before uploading
- Automate batch conversions with tools like XnConvert or ImageMagick
SEO impact:
- Smaller JPGs improve LCP and page speed
- Faster pages rank higher
- Core Web Vitals directly affect rankings
- Converting photographs to JPG is often a quick ranking boost
Tools for different scenarios:
- One-off conversions: Online tools (png2jpg.com, FreeConvert)
- Batch processing: XnConvert, IrfanView, ImageMagick
- Professional control: Adobe Photoshop, GIMP
- Automation: ImageMagick, Lambda functions, Zapier
The right format choice depends on context. Use this guide’s frameworks to decide what’s best for each image.
Frequently Asked Questions
Q1: Will JPG conversion make my image look terrible?
A: Not if done correctly. At 85–90% quality, most people can’t detect quality loss. Only at lower qualities (60% or below) do compression artifacts become obvious. Test at 85% first—most images look fine.
Q2: Can I convert JPG back to PNG without quality loss?
A: No. JPG is already lossy. Converting JPG to PNG just makes the file larger without recovering lost quality. If you need PNG, start with the original source.
Q3: What if I need transparency in a JPG?
A: JPG doesn’t support transparency. Your options: (1) Keep original as PNG, (2) Use WebP format (modern browsers support it), (3) Add a solid background color and convert to JPG. For web, WebP is increasingly the standard for images with transparency.
Q4: Should I convert all my PNG images to JPG?
A: No. Only photographs and complex images with gradients. Logos, icons, graphics, and anything with text should stay PNG. Converting the wrong images makes them look worse.
Q5: How much storage space will I save?
A: Depends on the image. Photographs typically compress to 10–20% of their PNG size (an 80–90% reduction). Graphics compress less. On average, expect 60–80% file size reduction for typical web photographs.
Q6: What’s the difference between JPG and JPEG?
A: None—they’re the same format. JPEG is the official name (Joint Photographic Experts Group). Early Windows only allowed 3-letter extensions, so JPEG was shortened to JPG. Both refer to the same format.
Q7: Is WebP better than JPG?
A: For new projects, yes. WebP is 25–35% smaller than JPG with better quality. However, older browsers don’t support it. Best practice: Serve WebP to modern browsers, JPG as fallback. Tools like Cloudinary automate this.
Q8: Should I convert for social media?
A: Yes. Facebook, Instagram, and other platforms optimize for JPG anyway. Converting first ensures your files are optimized before uploading. Most social platforms recommend JPEG for photographs.
Q9: Will converting to JPG hurt my SEO?
A: No, it helps. Faster images improve page speed, which affects rankings. If conversion maintains quality (85%+), it’s a net positive.
Q10: Can I batch convert 10,000 PNG files?
A: Yes. Use automation tools: ImageMagick (command line), XnConvert, Make.com, or Zapier. For very large batches, cloud solutions (AWS Lambda, Google Cloud Functions) can process thousands in minutes.
Q11: What quality setting should I use?
A: For most cases, 85%. Test by comparing original and converted side-by-side at 100% zoom. If you can’t spot quality loss, it’s good. For high-end e-commerce, use 90%.
Q12: Does JPG conversion support batches in WordPress?
A: Indirectly. Plugins like Imagify and ShortPixel auto-optimize images on upload, converting PNGs to JPG as needed. No manual conversion required—automatic.
Q13: What if my PNG has transparency and white text?
A: Converting will lose the transparency. If the background is white, the text may become invisible. Solution: Add a background color that contrasts with the text before conversion, or keep the PNG.
Q14: Is it safe to use online converters with sensitive images?
A: Reputable ones are. png2jpg.com, FreeConvert, and similar claim they delete files after conversion. For truly sensitive data, use local software (Photoshop, GIMP, ImageMagick) that never leaves your computer.
Q15: Why does my JPG look pixelated?
A: Quality is set too low. Re-convert at higher quality (85–90%). Pixelation (blocking artifacts) is a sign that lossy compression removed too much data. A properly converted JPG at 85% quality shouldn’t appear pixelated.